
Configure a workspace
The five configuration sections, from the workspace name to the variables of each environment, and what each changes.
Checked in the application on September 5, 2026
Who can Administrator
The configuration is the only place where a workspace’s settings are written once it is in service. The wizard does the same work once, in order; the configuration does it again cold, section by section, in no imposed order. It is reserved to the workspace administrator: other roles are sent back to the workspace home. Until GitLab is connected, the tab leads to the wizard.
The sidebar carries five sections. Under each name, a line sums up the state: “Connected” or “Token expires in 12 days”, “6 projects”, “4 branches · 3 env.”. Only the GitLab connection section carries a warning, when the token expires in less than thirty days or when there is no connection: it is the only failure that stops the whole workspace. On a small screen, the sidebar becomes a row of tabs above the panel.
Two sections, General and Branches and environments, have a “Save” button and an “Unsaved changes” badge. Leaving the section or the page with pending changes asks for confirmation. In the other three, every action is sent immediately.
General
Identity, naming conventions, integration key. On the right, two read-only cards: “Workspace state” (connection, mode, main branch, projects, environments, members, token expiry) and “History” (created on, last modified).
Identity
- Workspace name and Description (500 characters): what members see on the home page and in the header.
- Identifier: immutable, read-only, but selectable and copyable. It is the one that appears in URLs and API calls.
- Deployment mode: read-only, set at creation.
- Main branch: read-only, with a “Change” button that sends you to the Branches and environments section, where the choice is made among the tracked branches that do not deploy.
- Enable the Features screen: the module’s switch. Off, the tab disappears and the product owner can no longer validate; on again, the screen comes back intact.
Naming conventions
Three cards, one per screen they govern. Each pattern shows a resolved example under the field.
| Card | Field | What it does |
|---|---|---|
| Deployment | Tag name pattern | The name of the tags Deployer creates. The {version} token is required, without it every release would carry the same name. In branch mode, {branch} is available too. |
| Hotfixes | Maintenance branch pattern | Tag mode only. The branch created from the tag on the first hotfix of a running version. {version} token required. |
| Hotfixes | Hotfix branch pattern | The name suggested for a hotfix branch. The {issue} token is optional: replaced by the issue number, removed when there is none. |
| Hotfixes | Branch name without an issue | What replaces {issue} when no issue is resolved: three random words, or the title of the first selected commit. |
| Features | Feature branch prefix | The beginning of the branch names the Features screen examines, feature/ by default. The issue reference is read from what follows. |
The integration key
A secret to authenticate incoming calls to the workspace, distinct from the identifier, which is public. “Generate a key” shows it once; afterwards it stays hidden, and “Show key” reveals it on demand. “Regenerate” replaces the old one, which stops working immediately; “Revoke” removes it without creating another. Each action goes through a confirmation.
GitLab connection
The instance and the token Deployer uses to act on your repositories. The form on the left, the state card and the “Which token should I create?” help on the right.
- Read the state
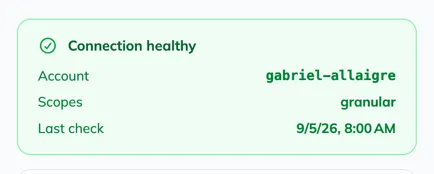
The card on the right says whether the connection is operational, the bot account, the scopes read from GitLab and the date of the last check. A token expiring in less than thirty days is announced above the fields, with the date: on expiry, the whole workspace stops working.
- Test
“Test” replays the connection and updates the state card. The verdict is in the card, not only in the notification.
- Replace the token
“Replace” opens editing: the instance URL becomes editable again too, because GitLab requires both together. “Verify and replace” tests the new token before saving it; the old one stays active until the new one is validated. Changing the instance unlinks the projects and removes the issue sources: a GitLab id only makes sense on its instance.

- Delete the connection
In the danger zone at the bottom. Deleting the connection unlinks every project of the workspace; tracked branches are kept.

Personal GitLab accounts (optional)
Under the form, a block marked “Optional”. Without a declared application, everything Deployer writes to GitLab is written by the token’s account. With one, each member can link their own GitLab account from “My GitLab account”, and their hotfixes then carry their name and their rights.
- Create the application in GitLab
Copy the Redirect URI shown, then create an application in your GitLab group (Group, Settings, Applications) with that URI and the
apiscope, nothing else:write_repositorydoes not cover the API, and hotfixes would fail.
- Fill in the application
Application ID and Application secret as GitLab provided them. A saved secret is no longer shown: leaving the field empty keeps it, typing a new one replaces it.

- Choose the fallback
“Act as the bot when no account is linked”: on, a member without a linked account goes through the token; off, they cannot create a hotfix until they have linked their account.

Linked projects
Two columns: on the left the repositories attached to the workspace, on the right those the token can see on GitLab.
- Link: tick in the right column, then “Link N projects” in the header. All or nothing: if GitLab refuses one project, none is linked and the offender is highlighted. An already linked project cannot be selected.
- Order: drag the projects on the left. The order is only a display order, nothing depends on it.
- Synchronise: rereads the metadata of every linked project. A failing project is listed, but stays linked; it is up to you to unlink it.
- Unlink: on a row, behind a confirmation. The project becomes available again on the right. Nothing is touched on GitLab.
Pipeline variables
On recent projects, GitLab refuses by default the pipeline variables sent through an API, and a tag-mode release then fails on a rights error nothing explains. The section sees it before the failure: a “Variables refused” badge on the repositories concerned, and an alert above the list with an “Open on N projects” button that lifts the setting, behind a confirmation, wherever the bot is a Maintainer. Repositories where it is not are counted separately: no button will save them, the bot’s rights must be widened first. A repository marked “Unreadable” could not be diagnosed; it is not a failure of the screen.
Branches and environments
The densest section, and the only one that changes shape with the mode: “Branches & environments” in branch mode, “Environments” in tag mode. A list on the left, the detail of the selected row on the right.
The list
- Add a row
The field at the bottom of the list creates a tracked branch in branch mode, an environment in tag mode, and opens the created row at once: an added branch is nothing yet until it is configured.

- Order
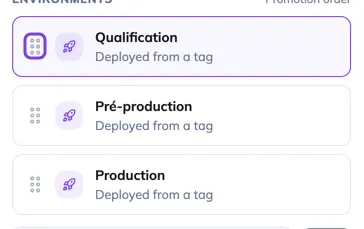
Drag the rows: the order of the list is the promotion order.
- Configure, then save
The right panel is edited on several fields at once, then “Save” sends everything. The bar at the top of the detail stays visible while scrolling, with the “unsaved” badge. Switching rows with pending changes asks for confirmation.

The detail panel
What it shows depends on the row and on the mode.
| Field | Main branch | Tracked branch alone | Environment (branch mode) | Environment (tag mode) |
|---|---|---|---|---|
| Git branch name | yes | yes | yes | no |
| “This branch is a deployment environment” | no | yes | yes | no |
| Environment name and description | no | no | yes | yes |
| Allowed source branches | no | no | yes | no |
| Variables | no | no | yes | yes |
| Labels | no | no | yes | yes |
| Actions | no | no | yes | yes |
| “Set as main” | no | yes | no | no |
| Delete | no | yes | yes | yes |
- Git branch name: case matters. Renaming here does not rename the branch in your repositories, do it on the GitLab side first. The environment name, on the other hand, is a label shown instead of the Git name in the history.
- Allowed source branches (branch mode): the branches a copy can start from towards this target. Without any source, the environment cannot be deployed, and the tile on the Deployments screen says so.
- Set as main: reserved to a tracked branch that does not deploy, behind a confirmation. Environments keep their source branches.
- Delete removes the environment, then the branch.
Variables
Key and value pairs, both accepting tokens. In branch mode they are written on the GitLab project before the branch copy; in tag mode they are passed to the release pipeline, and nothing is left on the project. The list of available tokens is shown under the block, and it depends on the mode:
| Token | What it holds | Mode |
|---|---|---|
{version} | The version number typed at deployment | both |
{environment} | The name of this environment, as typed | both |
{environment_slug} | The same name, without accents or capitals, for what GitLab refuses as a label | both |
{date} | The deployment timestamp, ISO format | both |
{description} | The description typed at deployment | branch |
{branch} | The target branch, the one overwritten | branch |
{ref} | The source branch, the one copied | branch |
{tag} | The tag being released | tag |
Labels
Key and value pairs carried by the environment, which give the grid of the Deployments screen its grouping and filtering axes: tenant=acme, region=eu-west-1. They never go into a pipeline; that is what sets them apart from the variables just above, and why the block is separate.
- The key suggests the axes already used in the workspace, so as not to create
tenant,clientandcustomerfor a single idea. The value is free. - Lowercase letters, digits, dot, dash and underscore only. Capitals are lowercased as you type; spaces, accents, comma and colon are refused, because they would make the filter URL ambiguous.
- An environment carries at most one value per axis. Removing the last label of an axis makes the axis disappear from the grid’s controls.
Actions
Manual buttons the Deployments screen shows in this environment’s panel: an HTTP call triggered by hand, to rebuild an index, flush a cache, restart a service. “Add an action” asks for a button name, a description (shown in the confirmation before running), the method, the URL, headers and a body sent as is. The URL, the headers and the body are encrypted and visible to administrators only. Each action shows its last run and its outcome: succeeded, failed, no response, blocked. Deleting an action takes its history with it.
Issue sources
The GitLab groups and projects where the Hotfix screen looks for issues when you type in its field. Same shape as Linked projects: declared on the left, available on GitLab on the right, with two tabs, “Groups” and “Projects”.
- Group: covers all its projects in a single call. The economical choice, as soon as a group gathers your boards.
- Project: itself only. When the boards are scattered under different subgroups with no accessible common parent.
- Fifteen sources at most: each one is a GitLab call on every search.
- An already linked project can still be selected here: carrying issues and being deployed are two independent roles.
Two more sections, depending on the modules
The sidebar gains an “Assembly” entry when you want to enable the assembled branch (module, branch name, orchestrator project, token, webhooks: see The assembled branch), and an “Artificial intelligence” entry for the assisted writing of release notes: a provider (Anthropic, or OpenAI and any compatible backend), an API key, a model. “Test” checks the key without consuming anything and lists the reachable models; the key never comes back out, replacing it means typing it again. Without a connection, the written note stays possible by hand.
Delete the workspace
At the foot of the sidebar, the danger zone carries “Delete workspace”. The confirmation asks you to retype the name. Members, connection, tracked branches and environments go with it; nothing is touched on GitLab.